A How To Guide for Buying On-Chain Cryptos and NFTs
This guide will teach you how to invest in nearly any crypto or NFT that is not yet listed on a major centralized exchange.
This guide is going to teach you how to buy cryptos and NFTs that are not yet listed on major exchanges like Coinbase. It will show you how to get your money into the crypto ecosystem, create a wallet, and buy your first crypto or NFT. I am not going to cover every possible way to do this but this guide will give you the basics you need to get started. From there, getting your money onto other chains and using other decentralized exchanges (DEXs) will be a similar process that you can figure out based off this information.
Lastly, I am not going to tell you this is an easy or smooth process, for some of you it may seem too complicated. But for now, its just the way the blockchain user experience is. If you take the few minutes to figure this out it can make all the difference in making a lot of money or a little bit of money in crypto. Finally, there are a lot of hackers and scammers out there trying to steal your funds I am not going to get into the weeds of security I will let you do that on your own, but just be aware of what you are doing here and always be on the look out for suspicious links and web sites. When in doubt better to be safe, than sorry.
1) Getting Money into the Crypto Ecosystem
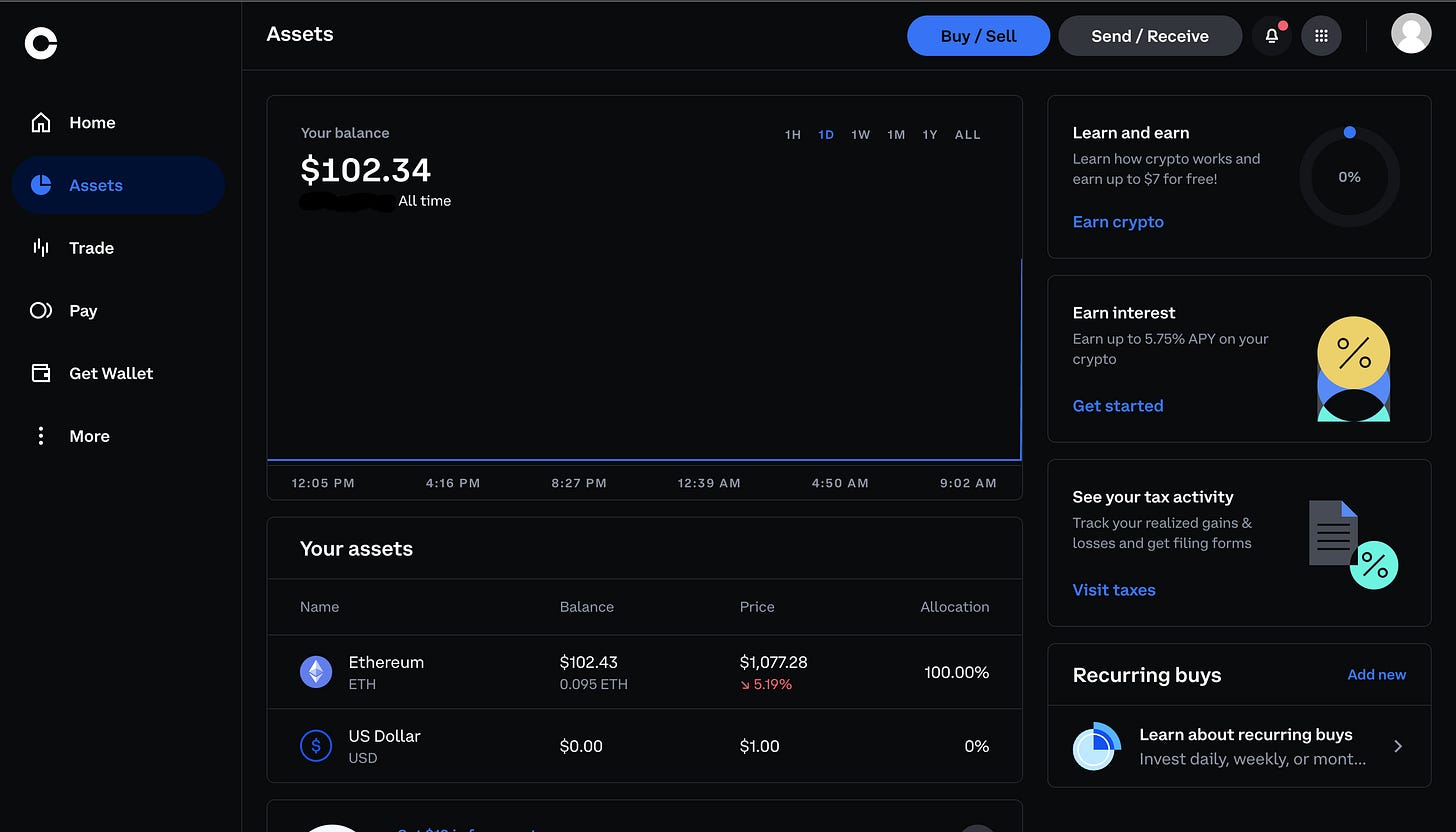
There are several major exchanges that act as on ramps into crypto. Most of you are familiar with Coinbase but there are others you can look into like Gemini, Kucoin and Crypto.com. These exchanges allow you to purchase crypto directly from your bank account or debit card. Setting up an account on these exchanges is a straight forward process so I will not explain it in detail here. Creating an account is similar to setting up a bank account. You will need to give them some personal information and some upload some form of ID usually.
Once you create an account and link it to your bank you can purchase any of the major cryptos like Bitcoin, Ethereum, Solana, or Avalanche. For the purposes of this article I will use ETH as an example.
Once you purchase one of these major cryptos you are going to want to get it off the exchange and into your wallet. Otherwise you don’t technically own the coins. If the exchange were to go under your coins would go too, so get your coins off of exchanges, they are not safe there.
2) Setting Up a Crypto Wallet
Before you are ready to get your coins off an exchange you will need to set up a wallet. There are many different wallets and there are two types of wallets. There are different wallets for different chains like the phantom wallet for the Solana chain, or the MyEtherWallet for the Ethereum chain. Some wallets, like Metamask, and Rabby.io are compatible with multiple different chains.
There are also two types of wallets, a hot wallet and a cold wallet. A hot wallet, is one where your private keys are in the browser extension, like the Metamask wallet. A cold wallet, is a wallet that stores your private keys offline in the wallet, like a Ledger or Trezor. Cold wallets are the safest way to store your crypto as they are not connected to the web. However, a hot wallet allows you to do transaction without sharing your private keys with anyone, the risk is that you have shared them with Metamask.
Metamask, is one of the most popular and widely used hot wallets so I will be using it for the purpose of this article. Metamask is an Ethereum network tool but it is able to connect to several different chains. If you would like to use other wallets the setup process will be similar. Metamask wallet is a browser extension that you can install with any chromium based browser. You will simply go to metamask.io and download the extension. Once the extension is downloaded you will create a new wallet.
Here is where it gets very important. When you create a new wallet you will be given a 12 word seed phrase. Do not share this seed phrase with anyone under any circumstance. Thats how scammers access your funds. This seed phrase is your lifeline to access your wallet in case of emergency. Write it down as many places as you need to and keep those somewhere extremely safe. Now that you have your wallet set up you will need to fund it.
3) Sending Crypto Between Wallets
In order to fund your new wallet you will need to send the crypto you bought on Coinbase or another exchange to your wallet. To do this is simple but its important you pay close attention to the details here so you do not send your money off into space. Your wallet has a public address located just under your account name or number. This is the address you or others will need to send assets to your wallet.
You will go to the exchange and click on the send/recieve button, in this case you are sending.
Now, this is where you need to pay attention. If you are sending Ethereum, MAKE SURE you are sending it to an Ethereum address. If you are sending AVAX, MAKE SURE you are sending it to an Avalanche address etc. If you send Bitcoin to an Ethereum address you will not receive it and its likely gone. Same goes for other cryptos. Once you have made sure you are sending it to the right network you will copy and paste your wallet address into the address box
It’s always good to make sure the address matches up before sending. You can also be extra cautious before sending a large amount by sending a small test amount first. Once you are confident the transaction looks correct you can click confirm and then send. Your Ethereum sent from Coinbase should then show up shorty in your metamask wallet. Now, you are ready to buy smaller cryptos before they hit it big and make it to centralized exchanges like Coinbase.
4) Buying Crypto on a DEX
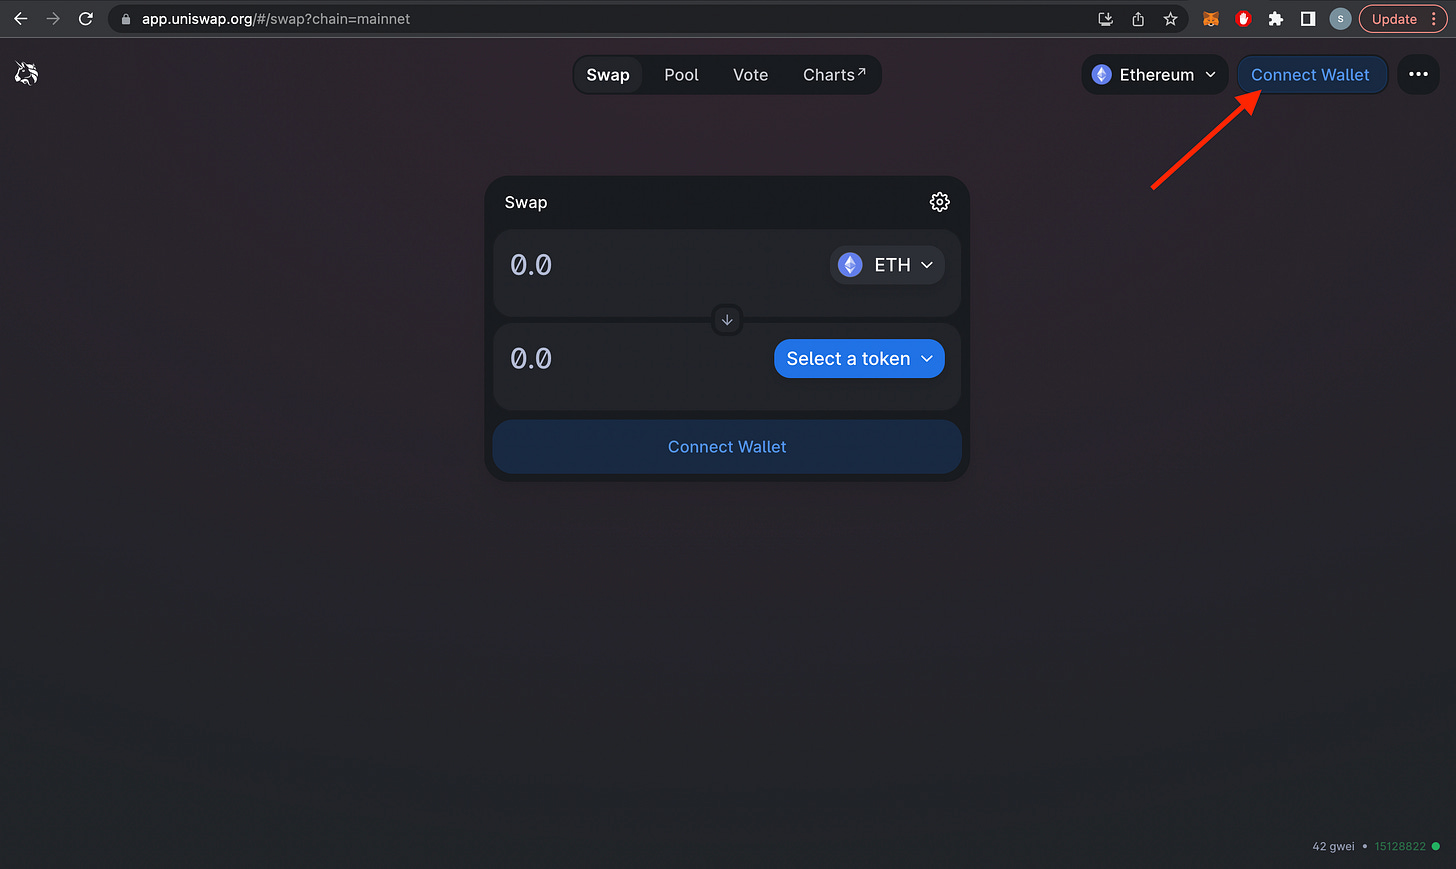
DEX is an acronym for decentralized exchange. Every network has their own DEX but they all function similarly. This is the place you will go to swap one crypto for another. For this article we will focus on Uniswap, which is the most used DEX on Ethereum. The first thing that you are going to want to remember is that it takes ETH to run transactions on Ethereum. So you will always want to make sure you have enough ETH in your wallet to buy and sell other tokens (I recommend at least $100). Don’t ever run your wallet down to 0 ETH or you will not be able to buy and sell tokens in your wallet. Same goes for other networks. For example AVAX network requires Avalanche tokens to run. Solana requires SOL, Polygon requires MATIC etc.
Now we are going to run a transaction to see how it looks.
First you are going to need to connect your wallet to the DEX. As you can see there is a connect wallet button on the top right of your screen. Simply click that button and select the type of wallet you have and connect it.
Once you are connected you will simply input the amount of ETH you want to swap and select the token you want to swap it for, in this case we will use MATIC.
Once you have your order set, you’ll click swap. It will then pull up another prompt to confirm your order. Finally, it will pull up your wallet to confirm or reject the transaction. Here, you can see the gas fees it will cost to run the transaction.
Once you confirm the transaction it will start working on the blockchain. You can then add the token to your wallet so it will appear in your wallet. Now, if the network is busy your transaction may fail. In which case you lose the gas money you paid and you can try running it again. Once transaction goes through you should see the tokens in your wallet.
What if I didn’t click the add token button and I can’t see the tokens in my wallet?
If you did not add the token in your wallet don’t freak out. It is not gone, you just have to manually add it.
you will need open your wallet and scroll down in your assets tab until you see the import tokens button. Click on that
Then click on Custom Token.
Now you will need to find the token address and copy and paste it into the form. There are several ways to find the address, but the easiest is to go to coingecko.com. I recommend you bookmark this site as its very useful on finding information on all tokens. Once you are here search your token, in this case, MATIC and it will pull up all relevant information. Over on the right, under where it says info, the first line is always the contract address. This is the token address for MATIC. You can simply click on the metamask fox icon and it will add the token to your wallet. Or you can copy and past the address into the custom token page and all the information should pull up automatically.
What if the token doesn’t show up when I search for it in the swap function?
Many tokens will not appear when you input them into the Uniswap search. To get them to pull up you will need to find the address for the token. To do this, simply use the information above and find the address on Coingecko, copy and paste the address into the search bar and it should appear. If the token is not yet on coingecko you will need to find it on dexscreener. Here you can find your tokens address on the right hand side where all the token information is if you scroll down.
5) Changing Networks
This information is not a need to know, but it’s helpful as you get more advanced in crypto. You will find tokens that are not on the Ethereum network but may be on Avalanche,Polygon, or some other network so you will want to connect to those networks in order to trade their native tokens.
Metamask wallet is compatible with several other networks like Avalanche, Polygon, Crypto.com, and many layer two’s. You can switch networks directly in the wallet but you will need to add them first. The process will be the same for all of them.
When you open your metamask wallet at the top you can see the default network is the Ethereum mainnet. Click on the dropdown menu and you can see the button to add network.
2. When you click on add network it will open up your wallet to fill out the fields of the network you want to add. To find the information you need for this for you can google “connect metamask to (insert chain you want to connect to here).” Several resources should come up. I know coinmarketcap.com (another good resource to bookmark) has a few guides for this. There are also several medium articles with network information. You will then just fill in this information to the fields and add the network. Now you can switch between networks.
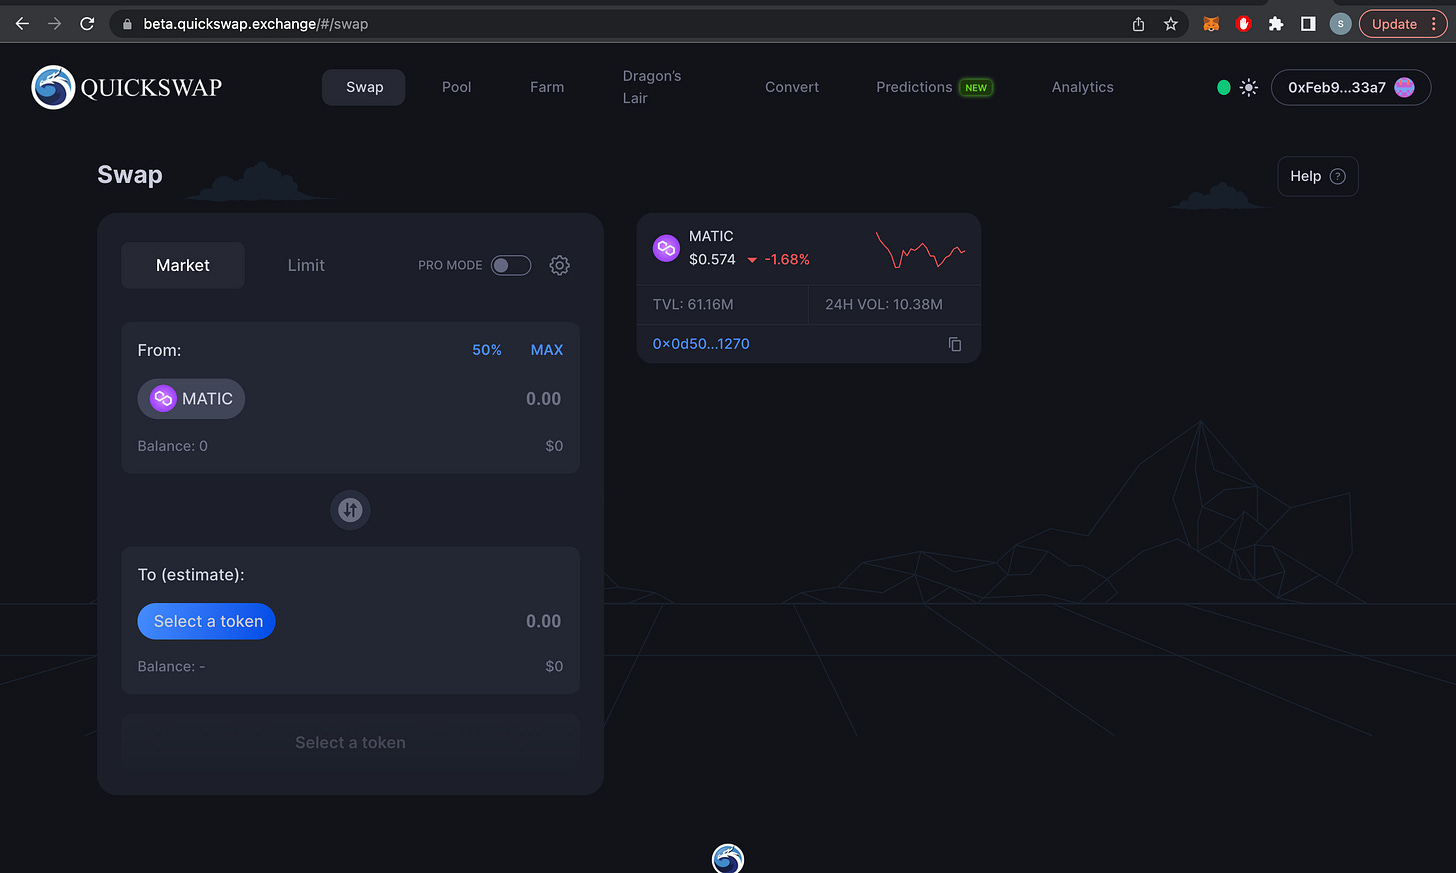
To get funds onto the new network, say it’s Polygon, you will need to use what called a token bridge. You can google which bridge to use for which networks. Remember, once you are on Polygon it will require MATIC tokens to transact not Ethereum. So you will need to bridge MATIC tokens to the Polygon network and then use the Polygon network DEX, which there is one called Quickswap. As you can see below other DEXs will have very similar user interface. Just connect your wallet to the site and you are ready to swap MATIC for other Polygon native, network tokens.
Lastly to know which tokens are on which networks just look at coingecko. The symbol by the contract address will tell you which network that token is tradable on. For example the JOE token, which is the Avalanche network DEX token, only trades on AVAX network. So you would have to add AVAX network to metamask, bridge your AVAX tokens to the network, and then swap for JOE.
6) Buying NFTs
Buying NFTs is fairly straightforward now that you have learned how to connect your wallet to different exchanges and networks. You will simply need to connect your wallet to whatever NFT marketplace you are trying to buy from. For example, the largest market places on Ethereum are Opensea and LooksRare. Solana is also has their own NFT market place called MagicEden. You can go to these sites, connect your wallet, and then use your crypto to buy NFTs. Usually you will find the connect wallet button at the top right corner of the site.
Remember, if you are on Opensea or LooksRare these are Ethereum NFTs and they will require ETH to buy. If you are on MagicEden these are Solana network NFTs and will require SOL to buy. An account should automatically be created for you based off your public wallet address. The NFTs you buy will automatically show up in this portfolio.
Conclusion
This is a basic guide for getting started in web3. You now know how to get your coins off exchanges, into a wallet, and connect to various DEX’s and marketplaces to trade. From here, it is fairly self explanatory, you connect to web3 websites and you are able to interact with them through your wallet. You can send and receive tokens or NFTs with addresses. You can participate in DEFI by connecting to protocols and staking your tokens. You can even mint NFTs by connecting to the project’s minting websites at the time of mint. It may seem a bit complicated at first but, I assure you once you do a few transactions you will get the hang of it fairly quickly. There really isn’t that much to it but, learning new technology can always be intimidating. However, I have found that there can be immense payoff by taking a few minutes to learn these skills.


